


- Clinical Video
-
Lecture
-
Implant
Esthetic Full Arch / Denture Digital -
Surgical
Tissue Management Bone Grafting Sinus Augmentation Immediate (Placement, Loading) -
Restorative
Esthetic Materials (Ceramic, Resin) Occlusion CAD/CAM -
Digital
Guided Surgery Treatment Planning Digital Scanning (Intra Oral, Model) -
Other
Practice Management Other
-
- Case
-
Event
-
Event Conferences
International Regional -
Calendar
International Regional
-
- Publication
Search Results
Home > Search Results
Results 1 - 12 of 12 for 'Digital'
-
Digital Workflow: R2 Gate guided surgery..
Digital Workflow: R2 Gate guided surgery Part 2
Presented By : Miguel Stanley
Hit : 308
-
Digital Workflow: R2 Gate guided surgery..
Digital Workflow: R2 Gate guided surgery Part 1
Presented By : Miguel Stanley
Hit : 299
-

In house R2Gate surgical Guide- Digital ..
Fully Digital Workflow using R2Gate digital planning and in house surgical guide.
Presented By : Miguel Stanley
Hit : 277
-

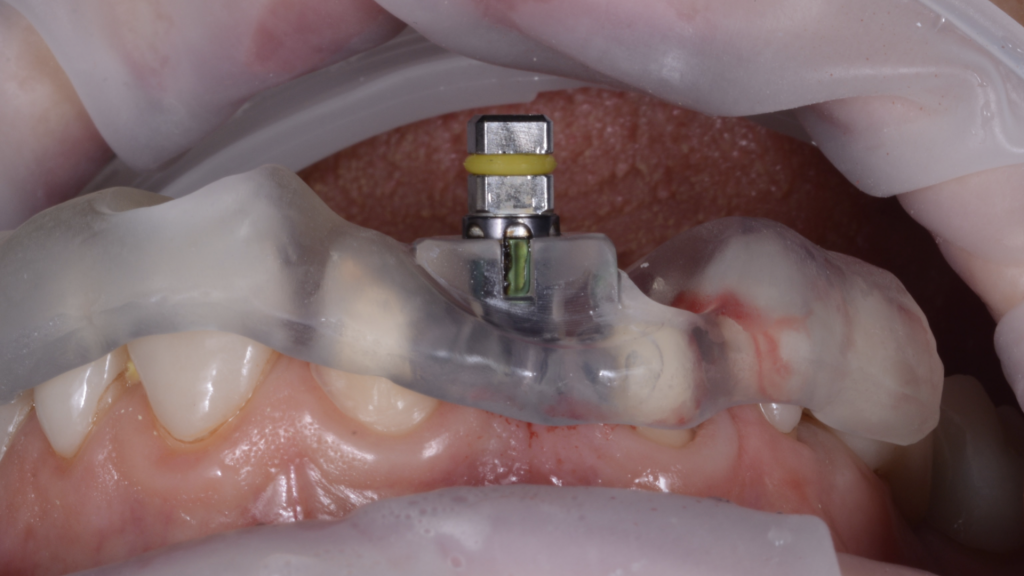
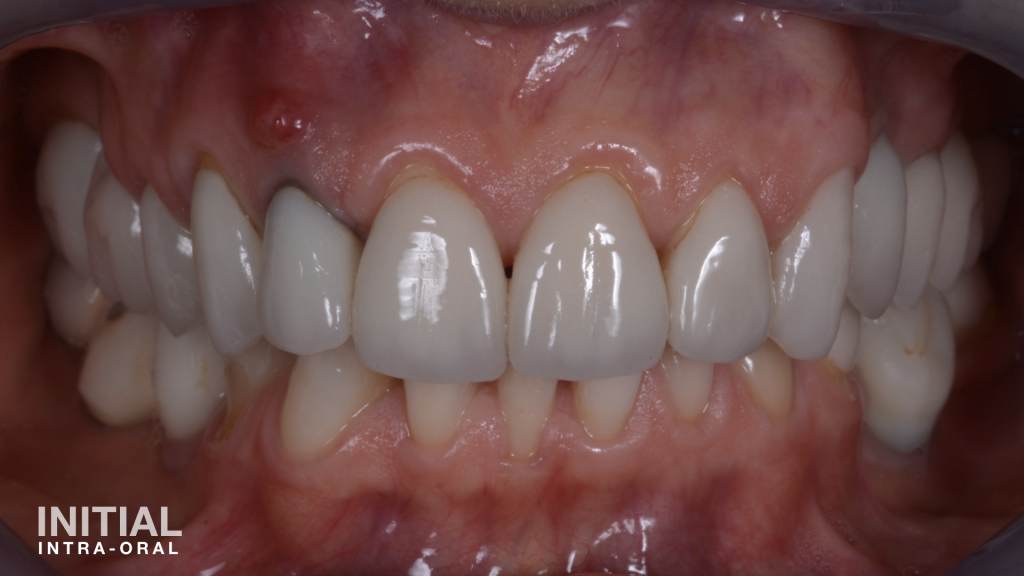
Dear colleagues!I noticed that lately, more and more doctors are posting their clinical cases of complex work, using digital technologies in varying degrees.This work was performed on the clinical basis of the Department of Dentistry Postgraduate Education "Medical University" Reaviz "in Samara i with Alexander LysovSo, the initial situation is standard. Partial secondary edentulous on the upper jaw.Together with the patient, it was decided to rehabilitate the upper jaw with a `R2. In this case, the task was to restore the function and aesthetics on the day of the operation with a non-removable structure.Computed tomography was performed with a special teaspoon, prints were taken, which were converted to the STL format. By combining the data, we created a virtual Wax-Up, planned with Yuri Sedov in R2gateRussia the installation of 8 implants. After that, the template was designed in such a way that it was possible to install permanent individual abutments.And an imprint was made virtually with what appeared to be installed implants and sent to the digital laboratory by Vitaly Tetkin for the manufacture of permanent individual zirconium abutments and CAD / CAM bridges.On the day of the operation, the removal of the failed teeth, the installation of dental implants and the simultaneous installation of permanent individual zirconium abutments were carried out; the temporary milled bridge was fixed on the existing cement and ATTENTION !!! Bridge sat! (Not perfect, as I would like, and still)Before the stage of final prosthetics, vestibuloplasty was performed on the upper jaw.The last but one photo is an inspection 6 months after the prosthesis.If you have any questions, follow to us in instagram @drsofronov and @drlysovMerry Christmas!!!
Presented By : Matvey Sofronov
Hit : 250
-
Digital workflow for prosthetic reconstr..
The outcome of immediate implant placement can be supported by an immediate provisional restoration at the time of surgery.After the healing period the prosthetic reconstruction has to guarantee the esthetic outcome as well as the stabilization of the soft tissue contours.By using the complete digital workflow from intraoral scan, printed models and CAD CAM based final prosthetics can help to create the final restoration more easily than the conventional workflow.Thanks to the great lab support by Christopher Jehle, Zirkon Customs, Germany
Presented By : Marcus Engelschalk
Hit : 894
-

Fully Digital Workflow for Single-Tooth ..
Fully Digital Workflow for Single-Tooth Implant Placement
Presented By : Miguel Stanley
Hit : 625
-
Anyridge Implant placement following a d..
A patient came to the office with a lesion on the 15. We decided to rehabilitate #15 and #16 with Megagen Anyridge implants, applying ozonetherapy, osseodensification using Versah burs, and bone regeneration applying Gen-Os bone graft mixed with i-PRF and a-PRF plug and membrane. We also followed a prosthetic digital rehabilitation protocol using the CS3600 intraoral scanner. This case is not finished yet. As you can see, a PMMA provisional bridge was placed.
Presented By : Miguel Stanley
Hit : 412
-

-
Digital planning, guided surgery, custom..
One recent case. Digital planning, guided surgery, custom abutments and cemented emax crown on top. I had doubts about implant angulation during planning, but decided to keep it simple and not to graft too much to get a better implant position, but to put implant in available bone. Comments and suggestions welcome as always : ) Part -2
Presented By : administrator
Hit : 364
-
Digital planning, guided surgery, custom..
One recent case. Digital planning, guided surgery, custom abutments and cemented emax crown on top. I had doubts about implant angulation during planning, but decided to keep it simple and not to graft too much to get a better implant position, but to put implant in available bone. Comments and suggestions welcome as always : ) Part -1
Presented By : administrator
Hit : 377
-
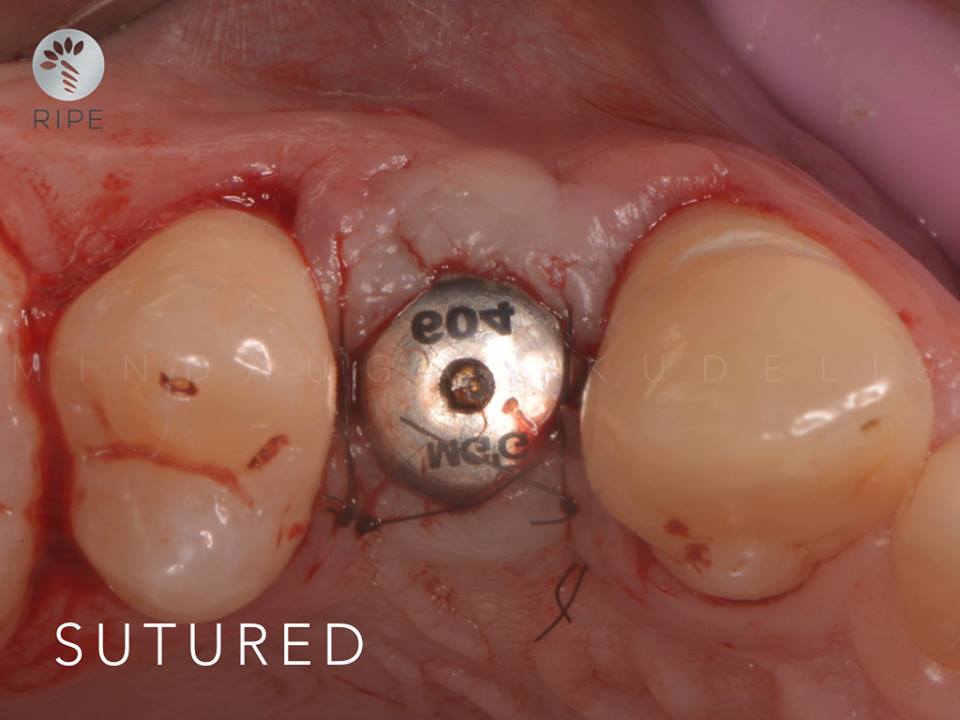
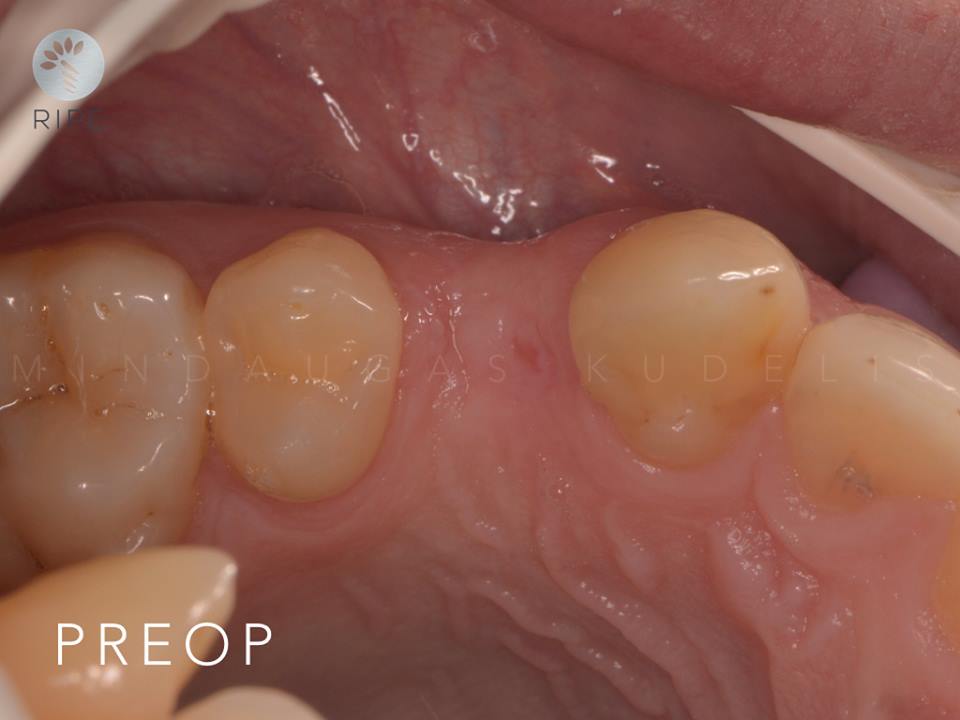
BUFFER-AREA PRESERVATION DIGITAL METHOD..
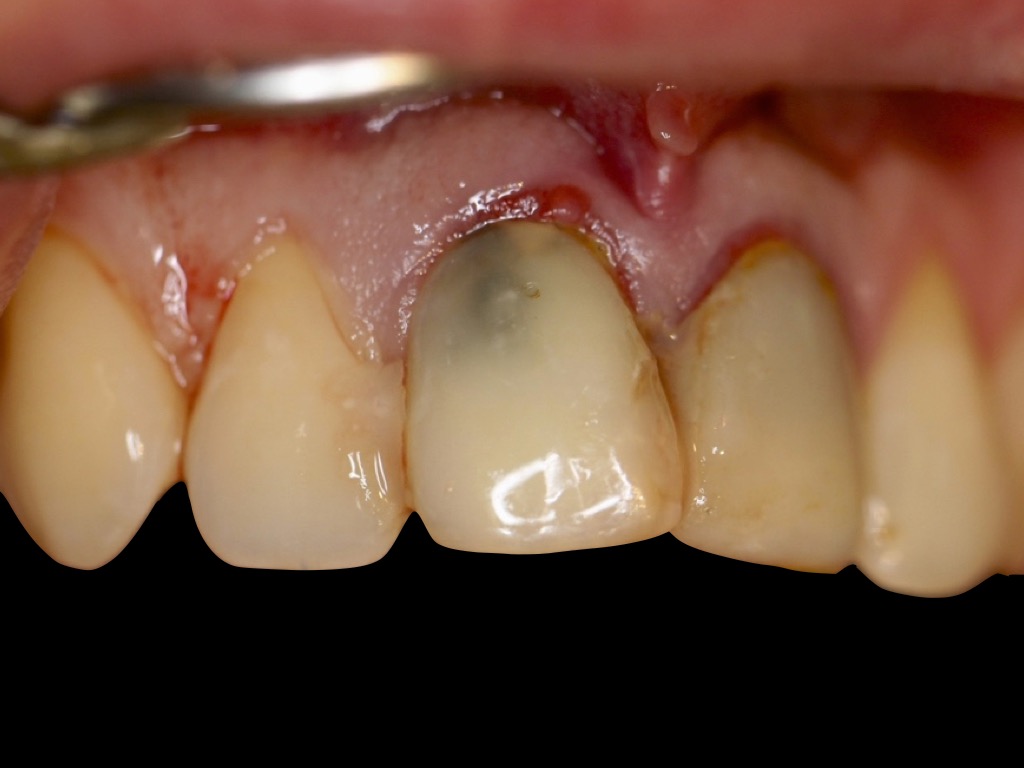
High aesthetic demands were placed on the forthcoming treatment as well as maximal sustainable result was expected by the patient. The following was decided: 1.Removal of teeth 1.1, 2.1 2.One-time dental implantation in the position of the removed teeth with AnyRidge implants using navigation guide R2GATE; 3.One-time installation of permanent zirconium abutments on the dental implants; 4.Provision of conditions for creating a buffer area in the coronal direction with the help of soft tissue plastic surgery by free connective-tissue auto transplants in the area of installed zirconium abutments; 5.Installation of temporary crowns on the fixed individual abutments.
Presented By : Aleksandr Lysov
Hit : 1021
-
Intedisciplinary management of a full mo..
Intedisciplinary management of a full mouth rehabilitation: the smile design of the 50 plus generation using AnyRidge, MILA Kit and MegRhein Attachment systemA 67-year-old man presented for the prosthodontic rehabilitation of his partially edentulous jaws. His dental history included some extractions of hopeless teeth and their replacement with fixed-teeth supported prosthesis. He expressed desire for the improvement of his chewing capacities and asked for changes in the appearance of his smile. Clinical and radiographic examination revealed a moderate to severe degree of alveolar ridge resorption, with major bone loss in the sites of tooth #33 and the right upper quadrant. Two implants were previously placed in position 43 and 33 to support a six units bridge, one of them failed.A treatment plan was prepared after a standard protocol that took into consideration the patient’s desires, treatment alternatives, and treatment costs. The plan included the surgical implant placement of 4 implants in each jaw and fabrication of a bimaxillary implant retained removable overdentures. We decided to maintain the implant #43 as an additional one to support the final mandibular overdenture, by the use of a Locator.Extraction of hopeless teeth and Socket PreservationThe first part of the treatment planning was the control of the chronic infections and extraction of all residual hopeless teeth with socket preservation technique to maintain the ridge volume. A temporary conventional complete denture was fabricated and used by the patient during a healing period of 4 months.Implant PlacementBecause of the adequate position of the temporary denture teeth, a decision was made to use a duplicate of the already fabricated dentures as a radiological and surgical template for the implant surgery planning and execution. The desired implant location was marked on the duplicate denture and stone cast. The duplicate denture was modified for the surgery by creating window-like openings in the areas of proposed implant sites. Vertical space analysis of the denture was performed for the selected attachment system (Locator Implants Attachment and MegRhein).Implant surgery included placement of the implants with the help of the surgical template. Implant surgery was carried out in a 1-stage surgical protocol. The implants were placed in the canine and first molar position for antero-posterior spread considerations. The implant site #16 presented a low height due to sinus pneumatization, a sinus lift was performed utilizing lateral window technique and MILA Kit (MegaGen, Kr). After completion, the complete dentures were relined with a soft-tissue conditioning material. No complications were encountered during the surgical phase. Five months later and after confirmation of the osseointegration, the patient presented for the definitive prostheses fabrication.Final Impression and Mounting to the ArticulatorThe maxillary and mandibular dentures were used as customized trays for final impressions. A closed tray impression technique was utilized. The Cuff height of the MegRhein abutments were selected based on the existing soft tissue depth around the implants. One Locator Abutment was placed on implant #43. The final abutments were secured to the implants, and the impression copings were placed.The final impression was taken using a combination of high polyether viscosity for borders registration and low viscosity polysulfide impression material placed inside the complete denture. Care was taken to center the denture during seating, and standard border molding procedures were used. After setting, the final impression was inspected and deemed acceptable. The duplicate denture was reinserted intraorally for the dentofacial evaluation, and the ideal location of the maxillary midline and incisal-occlusal plane was recorded. Standard photographs of the patients’ smile also were taken to be used in the laboratory for the denture tooth setup. The inter-maxillary bite registration was taken using a gothic arch tracer and the 3D position of the maxillary arch was registered using a facebow. The horizontal reference plane was the Camper Plane.The case was returned to the laboratory where standard protocols were used for the fabrication of the master cast. In the laboratory, implant analogs were attached to the impression copings, and a master cast was poured in type IV dental stone. The maxillary cast with the duplicate denture was positioned on the flat plane of the Kuwotech mounting plate. The occlusal registration tray was seated on the upper master cast, this one was secured to the index tray and mounted to the upper member of a semi-adjustable articulator (Op Finder, Kuwotech, Kr). The mandibular and maxillary master casts were articulated to each other with a centric relation record using the Gothic Arch Tracer, and the mandibular cast was mounted to the lower member of the articulator. Artificial denture teeth were selected based on the references provided by the existing dentures and the patient’s preference for a specific shade. The maxillary denture tooth setup was completed using the references provided by the Digital Smile Design Concept.The maxillary wax-trial denture was placed intraorally, and tooth position was evaluated using standard prosthodontic protocols. Proposed changes to the tooth position were recorded.Metal Framework FabricationThe selected attachments (Processing Capa) were placed on the top of the abutments. Undercut areas of the attachments were blocked out with wax. One layer of the baseplate wax was placed in the edentulous areas on the master cast. The refractory cast was fabricated by duplicating the master casts. The metal-reinforcing framework was waxed in a mesh-like form on the refractory cast, with leaving an adequate space for the resin material over the metallic caps. Several vertical retentive elements were waxed around the attachments on the framework. The framework was fabricated in the chrome-cobalt alloy using standard “lost wax” production techniques. The fit of the framework was verified, and its surface was finished and polished. The framework was positioned on the master cast.Prostheses Fabrication and DeliveryThe maxillary denture tooth setup was completed using the mounting plate, the the mandibular teeth mounted against the maxillary denture tooth setup. The wax-trial dentures were returned to the clinic for the try-in. The fit, occlusion, and esthetics of the prostheses were verified intraorally and approved by the patient.The prostheses were processed with a heat-polymeized acrylic resin using a standard compression molding protocol. The surfaces of the dentures were finished and polished. Processing clips were replaced with the light retention clips (Yellow for MegRhein and Blue for the Locator Attachment) respectively in the the mandibular and maxillary overdenture.In the clinic, abutments were attached to the implants and torqued to the manufacturer’s recommended value. The metallic female housing are picked-up to the framework with an autopolymerized acrylic resin, directly in the patient’s mouth, this will allow to take into consideration the soft tissue depression during function and better force management of the occlusal forces around the implants. The prostheses were seated, and excessive pressure areas were adjusted with the help of pressure-indicatingpaste.The desired occlusal scheme was verified and adjusted intraorally. The patient received maintenance instructions, and the recall appointments schedule was established. At the subsequent recall appointment, the patient expressed satisfaction with the treatment.Conclusion Among different treatment options, an implant-retained overdenture is a simple, cost-effective solution in the rehabilitation of the edentulous jaws. The overdenture design includes a metal-reinforcing framework and uses prefabricated stock abutments and hinge-type resilient attachments for its retention. The advantage of such type of prosthesis is unequivocal on the advantages of the implant-anchored prosthesis (eg, improved quality of life for the patient and long-term preservation of the remaining alveolar and basal bone). This prosthetic option reestablish the principle functions of the masticatory system: swallowing, incision and phonation, in additionto the esthetic and smile rehabilitation.
Presented By : Achraf - Souayah
Hit : 8990

MINEC MegaGen International Network of Education & Clinical Research
Copyright 2017 all right reserved.